Ringing Strings –
Crossing Fingers
Originally published in the Folk Harp Journal Winter 2008
Bobby’s lessons are on Monday afternoons. He is a talented and deeply involved student of the piano, always keen to play his music in the proper manner. He insists on knowing when the composer lived, what type of keyboard was being composed for, and anything else that might give him a clue to the story behind the piece he is working on.
Bookmarks for this page:
Two years ago, Bobby was beginning the study of one of the two-part inventions of J.S. Bach. We determined the key, identified the theme and listened to a masterful recording, all in preparation for his first week of work on this new piece.
Unexpectedly, Bobby looked at me and asked, “How would Bach have fingered this?”
Well, it so happened that about a year previously I had attended a lecture on just this subject: the fingering conventions of J.S. Bach. It was presented in a workshop on early keyboard music, and I had kept the handouts. The handouts, by the way, were written in Chinese because the Chinese presenter did not have a translation available. But I kept the handout, as the examples were given in standard musical notation.
“Let me find this handout I’ve got around here somewhere,” I said to Bobby as I rummaged through my music cabinet. “I heard a talk about this some time back, pretty interesti...oh! Here it is!”
And together we looked at the handout. The fingering of one scale passage in particular, which coincided nicely with the theme of the new invention, was most interesting. The scale was played with only two fingers of the hand, the ring finger and the middle finger, crossing over each other up the scale.
“That’s weird!” Bobby declared, “but it’ll be fun to try. Maybe it works like this...” and he began his experimentation at my piano. I settled back on my stool and watched him work, ready to offer encouragement but aware that I couldn’t offer much advise. I surely was not taught to cross my fingers at the keyboard like that! But he’s doing a good job, I thought, the way he’s doing that does make sense. Interesting, how easy that one trill is for him now, that weird fingering really sets him up well for that.
A bit tricky though, my thoughts continued, this crossing and reversing fingering, especially difficult on the horizontal plane of a keyboard. It would be so much easier to do that on the harp.
Do you ever have those moments when you realize that a stray thought is the best thought you have had in days? Perhaps in weeks? This was such a moment. It would be so much easier to do that on the harp! I laughed inwardly at myself as I recognized the impulse of that crazy professor, who suddenly and with no warning announces that class is over. “Leave me now, I must concentrate!” I wanted to say to Bobby, with an imperious finger-point to the door.
But, well, I had to finish his lesson, as well as Brenda and Bonnie’s after him. Then, forget dinner! I had to try this crossed fingering on my harp!
A Little History on Crossing Fingers
[Return to Top of Page](also called Paired-crossing Fingering
I found that indeed, it is much easier to execute crossing fingers on a vertical plane of harp strings than it is on the keyboard. Surprising, then, that this is not common harp technique, and yet it was standard at the keyboard in the Renaissance and Baroque eras. As I began research to look for evidence that the keyboard truly was played this way in the past, I found that this idea I first heard about in that workshop with Chinese handouts nearly four years ago appears now to be generally accepted fact, certainly among those writing on the subject for the past decade or so. An initial consulting under the simple heading “fingering” in the Grove’s Dictionary of Music and Musicians (2001, VIII p.832-841) was encouraging. Crossing fingers is presented there with illustrations from primary sources of the 16th and 17th centuries, reflecting practices that in all likelihood pre-dated the earliest manuscripts. The theories presented by the Chinese lecturer are validated.
In the intervening years since that magical lesson with Bobby, this technique has changed the way I play my clarsach. I have gone back to old repertoire and changed nearly every piece with an introduction of crossing fingers, in some cases in a single, isolated passage; in others with a complete re-fingering of the entire arrangement.
In July of 2008 I presented, for the first time, my own workshop on this technique at the harp (with handouts in English, not Chinese) and the reception of it was overwhelmingly positive. My private students have pronounced it to be “smoother”, “richer, with more substance,” “very satisfying to execute,” and just simply as fun to do.
Our brains and hands and minds enjoy novelty. The new subject at school, the new exercise at the gym, the new piece of music. Perhaps for this reason alone, it is worth trying this technique. By giving us another way to perform a typical passage of music, it breaks us out of our routine, and can thus help to bring fresh musicality to our playing. After all, who wants “routine” in their music?
Moreover, what can be more fun that finding a satisfactory way to play a tricky passage? After the first few weeks of playing and growing with crossing fingers, I began to recognize instances in my past work when I had used a crossing fingers approach without even realizing it myself. It was so natural it had already crept into my hands, unrecognized. Now that I recognize it, I would like to share it with you.
Just what is this technique? If you already know, I hope this article gives you the confidence to use it openly and freely. If this technique sounds new to you, then I invite you to read on and give it a try.
[Return to Top of Page]Crossing Fingers — A First Lesson
The concept of crossing fingers can be viewed as a “family” of techniques. It includes simple crossing fingers, paired fingerings, and full crossing of the fingers, to each of which there are damping patterns that can be incorporated. Additionally, these basic techniques can be used in conjunction with other techniques.
A useful and readily applied member of this family of techniques is “paired fingering.” There are two sets of easily paired fingers on the harp or clarsach (or keyboard, for that matter). We will here study only one: the pairing of fingers 3 and 4, the middle and ring fingers. In the interests of space, we will also limit our study in this particular column to a descending musical line.
The examples given below are in the treble clef. Please practice these ideas with both hands, bass as well as treble hand. This particular paired fingering comes in very handy indeed for the bass hand of the wire-strung harp, in the technique of Dancing Hands where the thumb of the bass hand reaches into the treble to help with melody production.[1] This “3/4” crossing fingers is also very apt for any type of walking bass line.
The following exercise and examples can be played in any tuning.
Please do follow these instructions very carefully, step by step. You may become frustrated if you skip ahead. This happens sometimes in my studio, when one of my students valiantly tries to jump ahead. Please take your time and follow each movement carefully, especially as I am not there to guide you.
Example One
- Place your fingers on C-B-A-G, thumb on C, 2nd finger on B, 3rd finger on A and 4th finger on G.
- Strike with fingers 1, 2, 3 and wait.
- 4th finger should still be on the G string. (Do not remove the 4th finger.)
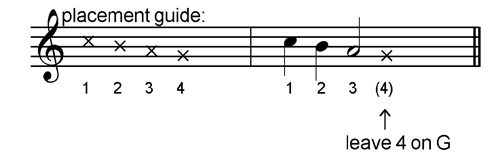
Once you are completely comfortable leaving your 4th finger on G, go on to Example Two!
Example Two
- Place your fingers as before, on C-B-A-G.
- Strike with fingers 1, 2, 3 and wait.
- Leave 4 on the G string.
- Cross 3rd finger over the 4th finger, going downwards on your harp strings.
- Place the 3rd finger on the F string.
- Both the 3rd and 4th fingers should be on the strings, 3 on F and 4 on G.
The 3rd and 4th fingers are “reversed” on your harp. This is OK! Who ever decreed “4 is a lower finger”?
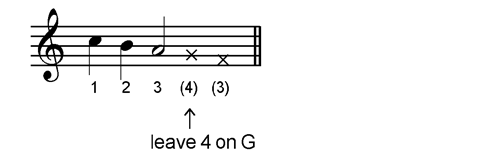
Example Three
- Repeat Example Two.
- Confirm that 3rd finger is on F and 4th finger is on G.
- With your 3rd finger fixed on the F string, strike G with the 4th finger
- Leave your 3rd finger on the F string after you strike the G with 4.
Congratulations! You have successfully crossed 3 and 4.
If you feel comfortable at this point, and want to go on, here is the next step. Here we see a very useful application of this technique: a five-note descending scale pattern with an evenly matched crossing of fingers.
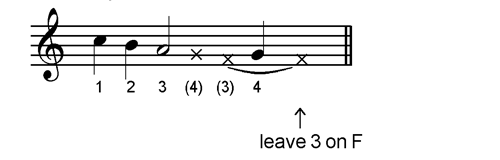
Example Four
We start out exactly as before.
- Place on C-B-A-G
- Strike with fingers 1, 2, 3. leaving 4 on the G string.
- Cross 3rd finger over the 4th finger.
- Place the 3rd finger on the F string.
- Strike G with the 4th finger.
- Strike F with the 3rd finger.
This approach could be useful for those times when you do not want to do a thumb cross-over, perhaps because the following passage goes back upwards. With just a little practice, you will find that crossing fingers can also be done more speedily than a thumb cross-over, perfect for that jig or reel on which you’re trying to increase the tempo.
The next step is a little more advanced, as we now pair the fingers 3 and 4 in a continuous crossing motion. Hold an image in your mind of walking down the strings as you try this final step in our first column on Crossing Fingers.
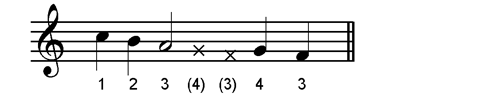
Example Five
- As before, place on C-B-A-G
- Strike with fingers 1, 2, 3. leaving 4 on the G string.
- Cross 3rd finger over the 4th finger.
- Place the 3rd finger on the F string.
- Strike G with the 4th finger.
- Cross 4th finger under 3rd finger
- Place 4th finger on the next lower string
- Strike with the 3rd finger.
- Cross 3rd finger over 4th finger
- Place 3rd finger on the next lower string
- Strike with the 4th finger
- Repeat from step 6!
The motion is that of walking down the harp strings. In place of the “left, right, left, right” mantra of marching, you may think “3rd, 4th, 3rd, 4th”. This can be kept up for as long as your harp has strings to step onto.
Just as in going down a flight of stairs with your physical feet and legs, you want to be sure that the next finger has landed on the next lower harp string (step) before lifting the previously placed finger to strike. (We are walking down the strings, not hopping or bouncing down them. Though you are welcome to experiment with skipping a step now and then, just don’t jump!)
If this technique is new to you, give yourself plenty of time to get used to these new finger movements. I believe that once you ahve them “in your hand” you will find yourself using them in nearly every piece of music you play.
[Return to Top of Page]Planxty-Dillon by Turlough O’Carolan
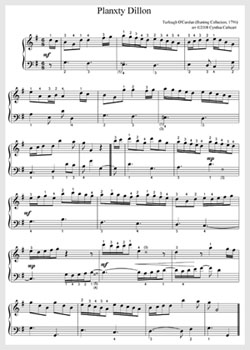
Click on the image above to download a pdf of the music for Planxty Dillon
Planxty Dillon by Turlough O’Carolan, as it was originally published in 1796 by Edward Bunting in A General Collection of the Ancient Irish Music appears as tune number 66 on page 36, the very last tune of the collection.
This version of the melody differs from that published by Donal O’Sullivan in 1958 in his book Carolan — the Life Times and Music of an Irish Harper. Sullivant explains (page 238) that the original melody has been amended by four additional notes, and that the bar lines were moved to accomodate this change. He does not say why he made this change. His version, which he entitles Gerald Dillon, is very nice and generally accepted as authentic, but I thought it might be even nicer to share iwth you here the original melody.
The music is carefully fingered so you can observe the places where crossing fingers can be effective. Damp markings have been avoided for the most part for two reasons. One reason is that I believe this technique is useful for all types of harps, even those that do not need damping. Secondly, if you have done the examples above as carefully as I am certain you did, you will not need notation of the specific damps...really anchors and preparations marks...required for this technique. It will be habit for you.
If you are playing on a resonant harp and find that damping is necessary, remember that “the trailing finger damps.” If the music is descending, then the thumb or index finger will probably be the best choice for damping. If the music is ascending, it may be the third or fourth finger will be the best damping options.
In the this arrangement, the treble hand is all in the treble clef, and the bass hand is all in the bass clef with one single exception that is marked in the music.
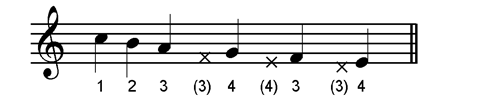
[Return to Top of Page]Guidelines to the Notation
An x–head on a staff indicates exactly which string to damp, and the parenthetical finger number tells you which finger to damp it with.
Notes with stems only going up in this arrangement indicate a note to be played with the treble hand.
Any note with the stem going down, or both up and down, is a note to be played with the bass hand.
In the this arrangement, the treble hand is all in the treble clef, and the bass hand is all in the bass clef with one single exception that is marked in the music.
Endnotes:
[1] Please see the Ringing Strings column in the Summer 2007 FHJ. A distinguishing feature of Dancing Hands is that the long fingers of the bass hand cooperatively share the tasks of striking and damping the bass accompnaiment, thus freeing the thumb to assist the treble hand in producing the melody. The long fingers are often placed in fixed position on just three strings, while the flexible thumb moves about in the higher range. Crossing fingers in conjunction with the Dancing Hands approach allows the accompaniment played by the long fingers to smoothly and confidently move beyond the limiation of three fixed stirngs.