Crossing Fingers
Originally published in the Folk Harp Journal Spring 2015 No. 166
Beginning something new is exciting, but it is also demanding, especially if that new thing is music. Some beginners are learning to read music notation, others may be concentrating on learning orally. Either way, or through some combination of the two, the beginning player must learn to recognize the shape of music: Are the notes going up or down? How far are they moving, to the next string or are they skipping a string? Are they skipping many strings? How many?
The questions don’t stop there, of course. If you are beginning on the harp, your fingers need to find those strings, in the correct order at the right time. Many harpers begin with fixed finger
assignments, tunes and exercises where each finger is assigned to one string only, and all fingers are placed on their assigned strings
before beginning to play. This limits the chances of playing the wrong string, but can feel constrained and stifling; not very conducive to the making of music.
And then there are questions that pertain particularly to a beginner on the wire–strung harp. What about damping? Ringing? There are so many questions, so much to learn, that it can sometimes be weeks of effort before anything sounding like music comes from your hands. This can be frustrating whether you are a beginning musician learning your very first instrument, or an experienced performer coming to the wire–strung harp from a different instrument or different type of harp.
The intent of this article is to provide early experience in a very useful wire–strung harp technique (that is not the fixed finger technique), to get some experience playing and listening to the distances between different notes, and to have remarkably beautiful music to play from your earliest days of being a harper.
The Divided–Hand Technique
A popular technique among wire harpers is the division of the hand into two parts: the first part is the thumb alone, with all its flexibility and strength; the second part is the three useful fingers working together in cooperation. Thus we have the thumb (finger 1) separate from the three useful fingers: the index finger (finger 2), the middle finger (finger 3) and the ring finger (finger 4).
This divided technique is used primarily in the bass hand, though it also works for the treble hand. My favorite application of this technique is to play with the three fingers of the bass hand fixed to three neighboring strings (sometimes for the entire tune, sometimes for only a phrase or two) and to use the flexible thumb to reach upwards to play higher strings. Those higher strings are almost always melody notes, so the thumb of the bass hand essentially becomes an extra finger of the treble hand. The treble hand and the bass hand thumb work together to produce the melody, which has the benefit of not only making the melody easier to play but also provides more choices for playing ornaments like grace notes or cuts. The three fixed fingers of the bass hand play the accompaniment.[1]
If you are a beginning harper, playing ornaments is probably something to look forward to, depending on your previous experience and perhaps that intangible thing called talent. Using those three fixed fingers to play the accompaniment is another goal. As preparation towards that goal, you can practice the basics of the divided–hand technique while playing the musically beautiful exercise presented here. You will gain experience in:
- playing with different fingers while the others stay anchored
- playing with a flexible thumb (breaking free of fixed finger playing)
- ringing and damping
- hearing the differences between different musical intervals (spaces between notes)
- making music!
Preparation
Enough rationalizing: let’s get started.
Step One: Place your three useful fingers on three neighboring strings. If you are unsure where to begin, putting them on C–D–E is a good place to start.
If wire–strung harp is very new to you, it might be beneficial to play around with just those three fingers, keeping your thumb in the air. Strike one string, bring that finger back, strike another string, bring that finger back, and so on. Play the notes disconnected (with silence between each, produced by bringing your finger back to the string before playing the next note) or legato (strike the new string at the same time you return the finger from the previous strike.)
We might notate this step thus:
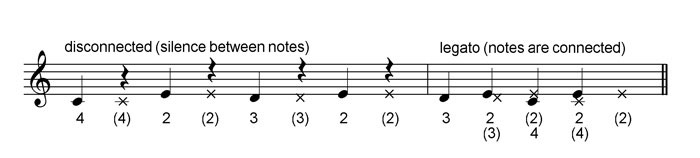
(x–head notes indicate the precise string you will return your finger to, and the parenthetical finger number tells you which finger does the returning. When a finger is striking at the same time another finger is damping, both the x–head and the note–head will be on the same stem, just like notes in a chord hang on the same stem.)
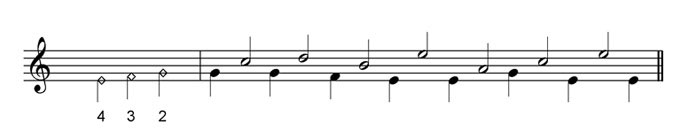
Step Two: Anchor your three useful fingers on three neighboring strings. Bring your thumb down to play any string that is higher than the strings your fingers are placed on. Play the string one step above your 2nd finger, then the string two steps (or strings) higher, then three, and so on. The goal here is simply to get used to striking with your thumb while the fingers are anchored, and to moving your thumb around.
We might notate this step thus:
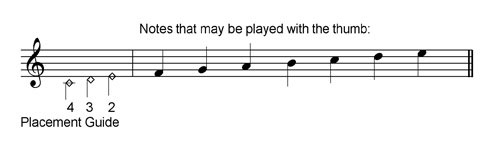
(The diamond–head notes at the very beginning are a placement guide, to show which strings your three useful fingers are anchored upon.)
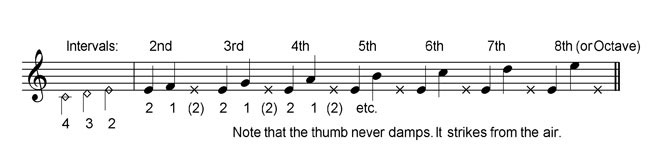
Step Three: Now you will begin to listen carefully to musical intervals. An interval in music is the distance between two notes. We count this distance in a very specific way: we count all the notes involved, including the notes that are sounding and the notes in between them. Assuming that your harp is tuned with no gaps or unison strings,[2] to figure what interval you are playing you need only count the strings being played and the strings in between. The resulting number is expressed as an ordinal number.
The example below includes the names of the intervals from the second to the eighth (more commonly called an octave). To play this example, you will strike the string on which your 2nd finger is placed, and then your flexible thumb will reach to play a higher note.
The example below is very predictable and definitely not very creative. The 2nd finger plays, the thumb then plays the string one note higher. How many notes are involved? Only two, there is no string in between, so it’s an interval of a second. Then, the 2nd finger plays again, the thumb plays the next string higher. How many notes are involved? Three, the two being played and the one in between them, so that’s an interval of a third.
Once you get this basic idea, rather than just play the predictable exercise above, look away from the notation and change the pattern to something that pleases you!
For example, you could play the 2nd finger, then play any higher note with your thumb. Play the 2nd finger again, then play a different note with the thumb. Or not: you could repeat the note you played before. You can also think about the intervals you are playing, or not. It’s entirely up to you and how much effort you wish to put into the exercise. If you just finished a tough day, you probably won’t be interested in training your ear to recognize difference between intervals. If you are feeling clever, you might want to concentrate very carefully to distinguish the sounds of the different intervals.
Step Four: Repeat Step Three above, but with the 3rd finger playing with the thumb.
Step Five: Repeat Step Three above, but now with the 4th finger and the thumb.
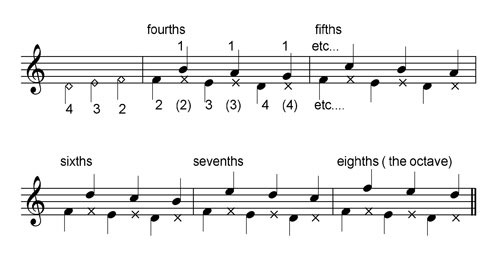
Step Six: Now we will use all three of our useful fingers with the thumb. We are also going to continue concentrating on training our ear to recognize the intervals on our harp. In addition, this exercise will also practice your muscle memory of how far to reach with your thumb to play a particular interval above the string you just played with one of your fingers.
We will begin with the interval of a fourth. Count the note you will play (let’s strike the string your 2nd finger is placed on), count two strings between, and strike the next string up with your thumb, which will be the note a fourth higher. (1+2+1 = 4). Then, you will play the note your 3rd finger is on, and the fourth above that (your thumb will strike a string lower than the one it just finished striking). Finally, strike with your 4th finger followed by the fourth above with the thumb.
The notation below shows this written out. In practice the three fingers may be placed on any three neighboring strings, so they have been shifted in the notation below. Build upon this exercise to practice playing an interval of a fifth, then of a sixth, a seventh and (especially if you are on the narrow spacing found on many wire–strung harps) an octave (or eighth).
Performance
Hopefully you found yourself playing some beautiful music as you went through the preceding steps. You are now ready for the full execution of this piece of music, something of beauty that is yours to create.
Placing your three useful fingers on three neighboring strings again, strike one of those strings and then strike a higher string with your thumb. Let the thumb’s string continue to ring while you return the finger. Strike another string with a finger (any one of the three, you can repeat the string you just returned to, or strike with one of the others as you please). Then strike the thumb again, on any one of the higher strings you please. Continue this pattern to play what sounds pleasing to you.
You can play the finger’s strings disconnected or legato (connected). You will generally be damping strings with your fingers, and letting the thumb’s notes ring, but you can also let one or two of the fingers ring now and then once you have built up confidence. For example, you could let a finger’s string continue to sound as you play the next string with the thumb, or you could even let it ring longer so it overlaps with the next finger’s string. Be careful to always keep at least one of the three fingers (finger 2, 3 or 4) on a string: a core element of this technique is that you stay fixed to your harp. At least one finger remains anchored on a string at any time. With one or more fingers as an anchor you will always know what strings you are on. As your knowledge of how far to reach for the different intervals improves you will also know which strings are nearby and how far away those strings are from your anchor.
An example of how this piece of improvised music might emerge is notated below. Notes with stems down are played by the fingers and notes with stems up are played by the thumb. Return the fingers to damp (or perhaps not as you get more comfortable) remembering to keep at least one finger placed on the strings. The thumb will never return to damp, only to play: the thumb’s notes will ring out unless you stop the string as you prepare to strike it again.
Please don’t play from this music notation. I have provided it here only as an illustration of how you might create your own music. Play it slow or fast, in various rhythms, and enjoy the sounds of your harp’s ringing strings!
Endnotes:
[1] For further discussion of this technique and a comparison to another popular divided–hand technique, please see my first Ringing Strings article which ran back in the Summer 2007 issue of The Folk Harp Journal. If you don’t have back issues of the FHJ, that article is also available in a slightly updated version at Kingdom Come and at Academia.edu
[2] Your harp is tuned with a gap or gaps if notes are skipped. For
example, many harps will have a gap in the bass; Edward Bunting describes a tuning on page 23 in his Ancient Music of Ireland (1840) for The Irish Harp of Thirty Strings
which has a gap (a missing note) between the low E and G strings. The same tuning includes a pair of unison strings, two G’s below middle C. Some harpers will tune their harps so they have separate strings for both B–flat and B–natural (so they have 9 strings in that octave). What matters in defining a musical interval is the note name
count, not the string count. If you have two strings for B (B–flat and B–natural) you will count only one of them to define an interval; if you have skipped a string in your tuning you will need to add that note–name to get the correct count. If you have one string tuned for each note name then you can simply count your strings since the note name count and the string count would be the same.
Some editorial changes were made to this article to suit a new layout as an internet website rather than a journal article. Originally published in the The Folk Harp Journal  Spring 2015 No. 166